Disk Usage reaching 100% disable superfetch in Windows PC

In some occasions when running Windows on Laptops and similar kind of machines with a less specification, we could sometime notice Disk Usage is reaching to 100%. 


This could be happened due to many reasons. But, in here we discuss about Superfetch service. This particular Superfetch service is a Windows feature that enables Preloading most frequently used Windows Applications. Even if the, original purpose of this is to boost loading speed, the Background process running in Windows could certainly cause high resource utilization, due to which HDD (Hard Disk Drive) usage would reach up to 100%. 


We can temporarily mute (disable) the Service, for this a System Restart is although imminent. 

1. Go to Start ⊞ Win

2. Type CMD.

3. Right Click on CMD Icon on Start Menu.

4. Open Command Prompt like 'Run as Administrator'.

5. Type Below Command.

sc stop “SysMain” & sc config “SysMain” start=disabled

6. Reboot Computer.


Now, you may be able to see if it actually do the trick and cause a drastic change in Hard Disk Utilization. If it doesn't provide any solution and you would need the Superfecth for faster application loading, use below command. 


1. Go to Start ⊞ Win

2. Type CMD.

3. Right Click on CMD Icon on Start Menu.

4. Open Command Prompt like 'Run as Administrator'.

5. Type Below Command.

sc config “SysMain” start=auto & sc start “SysMain”

6. Reboot Computer.


Signing Off ~ Peace!!

Quick Fix - Could not find this item. This is no longer located. Verify the item location and try again”

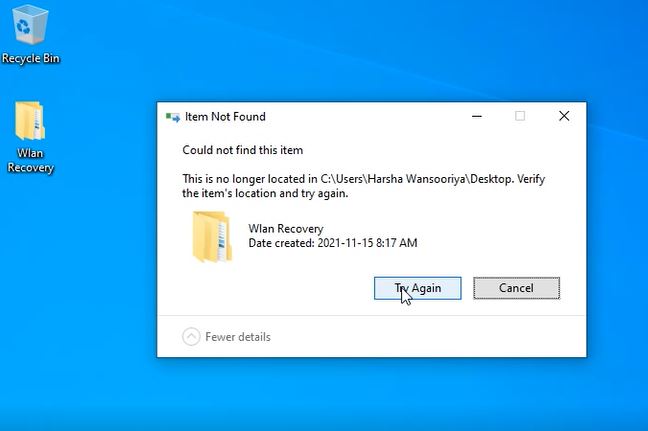
If you encounter below Error, and you are unable to delete an unwanted folder in Windows, there are things you need to do and you need to know before doing them.

“Could not find this item. This is no longer located in [Path]. Verify the item’s location and try again”

Most likely, File is created by a running third party service (An Application) and file extension is unrecognized in windows.


rd  - is the directory removal command in CMD.

1. Go to Start ⊞ Win

2. Type CMD

3. Type Below Command & Make sure to replace [PATH] with your undeletable Folder Location.

rd /s \\?\X:\"Need to delete path"

For Example : 

rd /s \\?\"C:\Users\Harsha\Desktop\Wlan Recovery"

This will completely remove the Directory. you will be able to see that the directory is no longer there use below command. 

cd "C:\Users\Harsha\Desktop\Wlan Recovery"
dir


Hope it Works!! Peace .

IP Addresses

The Internet is a global network of millions of computers. Each computer has a unique identity called an IP address.


Internet Protocol (IP) address -  is a Character Numeric value used to identify a particular device on a network.


There are three types of IP addresses.


Below screen from Windows PC (> ipconfig) command prompt show IPv4 address 192.168.8.152 which is a dynamic address and it's assignment managed by DHCP of the Router.


By Changing network properties we can arrange static IP for our Local PC.


There are two types of IP versions. 


source: arin.net & 
journalsnews.blogspot.com


We can view the current IPv4 and IPv6 addresses assigned to our local PC if we are in a windows PC like below.


Signing off. ~ Author.

Concise Discussion on Objects & Classes (OOP)

OOP (Object Oriented Programming) is superseding fundamental concepts of Procedural Programming. Both Procedural and Object Oriented Programming are falling under Imperative Programming paradigm and the key noticeable difference in between two is that Procedural Programming is building methods that perform operations on data and in contrast OOP is building objects that could carry data as well as methods.


Known OOP languages like Java, Python, Ruby, Visual Basic, PHP, C++ and Delphi consists features of OOP.


There are 6 concepts under OOP  to learn, after which we can a get brief understanding of what actually OOP is. To begin with, sound understanding of the Objects and Classes is important.


Objects

Objects are instances/variance of Classes. These are real world objects like Dog, Cycle and Even Smartphone is an Object.


Class

Class is a blueprint, a prototype that contains (attributes) variables and methods (behaviors).


Objects & Classes

Looking at below example, Smartphone can be considered a Class. Smartphone class has attributes (Variables) like Model, Year & OS_Version and also behaviors (Methods) like charge, on and off. 

Samsung, Huawei and Apple are objects (Variants) of Smartphone class and therefore gets all the attributes and behaviors of Smart phone Class.

Shown below is a Java code sample which further explains this. Smartphone class has attributes like model, year and OS version. Also it has methods like charge, on and off.  'Samsung' is an instantiation of the Smartphone class (an object of Smartphone class) and by default obtains the attributes and behaviors of Smartphone class.

 
public class Smartphone {
    
    String model;
    int year;
    String os_version;
    
    public String charge(){
        return "is Charging \n";
    } ;
    
    public String on(){
        return "is On \n";
    } ;   
    
    public String off(){
        return "is Off \n";
    };   
    
    public static void main(String [] args) {
       
        Smartphone samsung = new Smartphone(); // object of smartphone class
       
        String messsage =
               
                "Main method is running and we have created samsung object from Smartphone Class."
               
                + "Samsung" + samsung.on()
                + "Samsung" + samsung.off()
                + "Samsung" + samsung.charge()
                
                ;
       
        System.out.println(messsage);
       
    }
    
}


Output is as below.

Signing off ~ Will be back with next OOP lesson > OOP Inheritance.

Android Studio in Ubuntu Linux ? Why not ?

Recently, I tried to replace the Eclipse Android Development Environment in my computers with the Android Studio Developed by Google. But, unfortunately ended up getting so many errors on Linux Ubuntu.

After some digging on the internet and many failed attempts to change permissions in directories of the Operating System, I finally managed to get things working and thought that I could write this down in the Notes, So, that in the  future there won't be any inconveniences. 


First I downloaded Android Studio from the official developer Web Site here.


After downloading the .zip file. I extracted the whole thing By Just Right Click-> Extract Here.

Inside the Extracted android-studio/bin Directory there's 'studio.sh' which is the 'Self Extracting Archive' is the file to be executed, to do that I just launched my terminal. (Ctrl + T)


$ cd Downloads/android-studio/bin
$ ./studio.h


It took a quite a bit of time and ended up, showing an error for the versions. That was completely annoying and it kept coming. 

So, initially, what I thought was that It could be a problem with the Java versions and I tried to understand which version of it that had at the moment.


$ java -version
$ dpkg --list | grep -i jdk


It showed me that I had OpenJDK 6. So, I decided to Update the Java Version. 

$ sudo apt-get update   
[ To Download the package lists from repositories. ]
$ sudo add-apt-repository ppa:webupd8team/java 
[ Add the Repositories if it doesn't exist ]
$ sudo apt-get update && sudo apt-get install oracle-jdk7-installer
$ update-alternatives --display java

At the end of this line, I had to opt the Required version and I typed #3 which was the required OpenJDK1.7.0. And I tried running the './studio.h' again and guess what I ended with the, Error message saying "tools.jar is not in android studio class path Please ensure JAVA_HOME points to JDK rather than JRE". 

As usual when it comes to settings related to default paths, what comes to our mind usually is, '.bashrc'. So I ran the following commands.

$ cd ~
$ vi .bashrc


I added the following lines at the end of the '.bashrc' having typed the comments for future references. Comments are shown after '#' in shell scripting.


# comment : the .bashrc is eddited to add java_home by Harsha
JAVA_HOME="/usr/lib/jvm/java-7-openjdk-i386"
export JAVA_HOME
PATH=$PATH:$JAVA_HOME

I Saved the file, and ran, 


$ source ~/.bashrc
$ echo $JAVA_HOME


Above is to test that it echoes the Java path. Then , I tried run the '/studio.h'. Still I kept getting the Error "tools.jar is not in  android studio class path Please ensure JAVA_HOME points to JDK rather than JRE". 

After digging the Internet for around 10 minutes, I found out the way of doing this. So, Here's the whole thing. Exporting the JDK path in the '~/.bashrc' won't give us the right answer. So do the following.


$ sudo apt-get install openjdk-7-jdk  [ If you don't have it ]
$ sudo vi /etc/environment


Add the line. 

JAVA_HOME=/usr/lib/jvm/java-1.7.0-openjdk-i386 


Save & Close. You probably would require a reboot of the System. After the Reboot is made, run the '/.studio.h' and you'd love using Android Studio which is a better application by the way.


Thank You.

How to get Ubuntu Linux Desktop 'Jelly' Conky ?

In this post, I wanted to write about 'Conky' of which you may or  may not have heard about before.

Conky is licensed under GNU Public License 3.0 and a free software  that runs in BSD.  It's a system monitor an extended version of 'Torsmo' which is no longer developed. Even if it's called a system monitor, it can be used to gather information from many sources like weather sources and time servers.


It's funny because it is said that Conky is a name adapted from a Canadian TV Show 'Trailer Park Boys' according to the Conky official web site.  Visit the Documentation of Conky here.


In this, post I thought of writing about a customized system clock  which will add colour to your Linux environment called 'Jelly Conky'.


  1. To add 'Jelly Conky' You've to install Conky installed in the first place so Open terminal by 'Ctrl+T'.

  2. To Install Conky run the following command.

    $ sudo apt-get install conky 


  3. Download Jelly Conky from here and extract the zip file to download location.

  4. Start a separate Terminal and run the following command to get the full permission to access directories.

    $ sudo nautilus


  5. Go to download extracted location and find 'jelly-conky' directory. You'll find a font directory jelly-conky/roboto-font. Access it and install all the .ttf (True Type Face) by 'double click'-> 'install'.


  6. Press 'Ctrl+H' to show the 'Hidden Files' and access jelly-modes and pick a widget you need either one of 'Clock','Clock+Date' or 'Clock+Date+Weather' with a preferred size 'Big' or 'small'.

  7. Copy hidden '.conkyrc' to 'home' directory. To do that run the following command. Either you can run the following command in the terminal or use GUI file manager to do so.

  8. Run the following command to install 'curl' in Linux.

    $ sudo apt-get install curl


  9. Open '.conkyrc' and start editing the file.

    $ sudo vi ~/.conkyrc


  10. Go to yahoo weather page here. Search your city, check the address bar and copy the WOEID (Where on Earth ID).

    ['http://weather.yahoo.com/sri-lanka/central/kandy-2189780/']


    In my case from the URL I copied '2189780' to the existing id of '44418' in the '.conkyrc'.
  11. Now run following command to run the Conky.

    $ conky 


  12. While the Conky is running, change either gap_x and gap_y or uncomment '#alignment' to move the Conky around.

    That's it. Enjoy.

Adding Look and Feel for Swing Based UI ?

After quite a while, I thought of writing a Blog post based on Java Swing Development and I thought of writing something cool as well as simple. Improving Look and Feel in a Java Swing based UI could be a simple but necessary thing because it could improve the quality of your application inside and out. 

In order to do this, the best thing to do is to download and add Java Synthetica Addons, because they're easy to apply on the current working project of yours. But, there's this little problem of Synthetica Addon is not to be distributed for free.

But, there's a good news and a bad news. The good news is that there's a lot of Free download links to download these Synthetica Jar Archives, yet the bad news is that they're older and most often doesn't work with the newer versions of java.

Then, how to download the newest cool improved version of Synthetica Addons and often at the same time make them not to show Watermarks like they usually do. Let's explore the Clear step wise explanation of Adding New Synthetica to the Java Swing UI.

I'm using Net beans as my Integrated Development Environment in order to perform this task. No matter what you use as your IDE, you can follow the steps as follows.

Step 01

First, create a new Project as of 'Some Name'. In my case, it's UI.


Step 02

Add a JFrame of your Liking and write the following Piece of Code inside the main static method of the 'Project Name'.java's 'Project Name' class.

            java.awt.EventQueue.invokeLater(new Runnable() {

                public void run() {
                LookAndFeel look;
                try
                {
                    look = new SyntheticaStandardLookAndFeel();
                    UIManager.setLookAndFeel(look); //calls setLookAndFeel static method
                    new First().setVisible(true); // First is the JFrame that I've created
                }
                catch(Exception ex)
                {
                    ex.printStackTrace();
                }
                
            }});


I'd like to explain few of the Self evident factors regarding this piece of code that I've given above. The Frame contains an UI thread, but the invokelater method of the EventQueue Class of the Java abstract window toolkit (awt)  package updates the Frame's UI thread. Runnable is an Interface which includes a run method, but the declaration and implementation of the run() method, the run method of the original interface is overridden. Inside it, an object of the LookandFeel class of swing package is stored with an instance of the SyntheticaStandardLookAndFeel class. In the next line, a Static method has been called without creating an object from UIManager Class as  creating objects is unnecessary when it comes to calling static methods. Surrounding, it with a TryCatch is important as there should be a way of Catching Exceptions.


Step 03

In order to avoid the references problems you've to download, the Synthetica Packages from the jyloo.You can then unzip the Downloaded Zip file & then try to add the Jars as libraries into the Project by right clicking in the Project Explorers Library Folder and add Jar Option. You've add Synthetica.jar.


Step 04


When running the Project, it seems that the Synthetica has been applied with the Water Mark stating that 'Synthetica' is an "Unregistered Evaluation Copy". Then, the problem is how to remove this watermark. I've included the steps of doing that.

Step 05

Download and unzip the 'rej' which enables us to edit the Synthetica.jar and make the Synthetica Unregistered Evaluation Copy Message Disappear. Then, run rej.jar by double clicking it. Open the Synthetica.jar inside the Project folder.


Then, Select the 'de/javasoft/plaf/synthetica'.


Then, select 'SyntheticaRootPaneUI.class' and double click it and open it.


Step 06

Then press Ctrl+F to find the Method 'isEvalCopy' method.


After finding the relevant Method as shown in the Image itself, right click on 'iconst_1 1' and click insert after. Then in the coming dialog box choose 'iconst_0 0'. 


Now, remove 'iconst_1 1' and save the changes made to .jar.


Step 07

Finally, take the search tab and Search for the term 'invalid' by typing it in the search bar.


Pick the 4th From the Top Search result which is 'Instruction : de.javasoft.plaf.synthetica.SyntheticaLookAndFeel$1.showDialog .....' , and double click on it.


Step 08

You'll find the showDialog() method and remove the whole content inside it, but make sure that the method has only 'return' statement in it.


That's all. Now, you can rebuild the Project and Run it. You'll find the Synthetica applied to the Swing application without 'The Water mark'. That's something.

Wireless Ad Hoc Internet Connection with Windows 8/8.1

If you're a person who travels a lot, even if you like, you don't have the luxury of Carrying your WiFi router every where you go. Probably you're using a Wireless Broadband Connection with a typical Mobile Broadband USB Stick , the Dongle as we call it, whenever you're on the move.

But, unfortunately if you're using a a Smart phone or another laptop other than the one you're using, You may need another one of those Broadband Connections or a data Connection along side a Dongle in the case of  a Laptop. 

Even if you wanted to buy a Mobile Broadband WiFi Router Dongle it'll cost you $50-$60, if you're looking for at least a Huawei Product. It's an extra burden, as You've to carry the Charger, the dongle itself with USB Cable and Lithium Ion Battery.


You don't have to do this, as you can create an Ad Hoc Wireless Internet Connection by using your Laptop to share the internet connection with Any other device. So, Here's how you do it.

I've used the Term Windows 8/8.1 as you can see in the Topic, Because I've it installed in my Computer as well as the fact that, this feature isn't highlighted as a Separate tool or something But, it's obvious that Turning A PC into a Virtual Router is quite intriguing. So, Follow the Easy Steps as usual.


01. Run the Command Prompt with Administrator Privileges.


02. Run the Following Command to make sure that, your Wireless interface Supports Hosted Networking Which is vital to create the Ad Hoc Connection.

 netsh wlan show drivers 

03. Check if, it Shows "Yes" for the Hosted Network Support. You've make sure that, your Wireless interface supports Hosted Network or else you've to upgrade your hardware.


04. Then, type the Following Command into the Command Prompt with your own, Revisions to it as your SSID and key should be unique for you.


wlan set hostednetwork mode=allow ssid="network_name" key="password"


after running the Command, make sure you get the Result as follows.  


05. Then, type the following Command in to the Command Prompt to start the Hosted Network. You can use the same command with the Revision "Stop" instead of "Start" to Stop the Network being Broadcasted.


netsh wlan start hostednetwork


06. Make sure that You've enabled your WiFi Adapter in the "Change Adapter Settings" and One Final thing, you've to enable the current Internet Connection with the Dongle to Share in order to do that, Go to "Network and Sharing Center" & to the Properties of the Current Connection.


07. Then, go to "Sharing" Tab. Enable "Allow other network users to connect through this Computer's internet Connection" and Select the Connection from the Drop down.


Then, try using the already broadcasting WiFi Connection with Any of your Device. Enjoy!