Showing posts with label Software. Show all posts

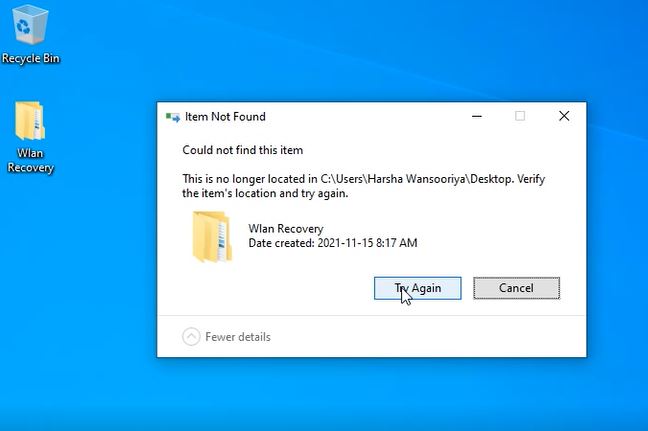
Quick Fix - Could not find this item. This is no longer located. Verify the item location and try again”

If you encounter below Error, and you are unable to delete an unwanted folder in Windows, there are things you need to do and you need to know before doing them.

“Could not find this item. This is no longer located in [Path]. Verify the item’s location and try again”

Most likely, File is created by a running third party service (An Application) and file extension is unrecognized in windows.


rd  - is the directory removal command in CMD.

1. Go to Start ⊞ Win

2. Type CMD

3. Type Below Command & Make sure to replace [PATH] with your undeletable Folder Location.

rd /s \\?\X:\"Need to delete path"

For Example : 

rd /s \\?\"C:\Users\Harsha\Desktop\Wlan Recovery"

This will completely remove the Directory. you will be able to see that the directory is no longer there use below command. 

cd "C:\Users\Harsha\Desktop\Wlan Recovery"
dir


Hope it Works!! Peace .

Android Studio in Ubuntu Linux ? Why not ?

Recently, I tried to replace the Eclipse Android Development Environment in my computers with the Android Studio Developed by Google. But, unfortunately ended up getting so many errors on Linux Ubuntu.

After some digging on the internet and many failed attempts to change permissions in directories of the Operating System, I finally managed to get things working and thought that I could write this down in the Notes, So, that in the  future there won't be any inconveniences. 


First I downloaded Android Studio from the official developer Web Site here.


After downloading the .zip file. I extracted the whole thing By Just Right Click-> Extract Here.

Inside the Extracted android-studio/bin Directory there's 'studio.sh' which is the 'Self Extracting Archive' is the file to be executed, to do that I just launched my terminal. (Ctrl + T)


$ cd Downloads/android-studio/bin
$ ./studio.h


It took a quite a bit of time and ended up, showing an error for the versions. That was completely annoying and it kept coming. 

So, initially, what I thought was that It could be a problem with the Java versions and I tried to understand which version of it that had at the moment.


$ java -version
$ dpkg --list | grep -i jdk


It showed me that I had OpenJDK 6. So, I decided to Update the Java Version. 

$ sudo apt-get update   
[ To Download the package lists from repositories. ]
$ sudo add-apt-repository ppa:webupd8team/java 
[ Add the Repositories if it doesn't exist ]
$ sudo apt-get update && sudo apt-get install oracle-jdk7-installer
$ update-alternatives --display java

At the end of this line, I had to opt the Required version and I typed #3 which was the required OpenJDK1.7.0. And I tried running the './studio.h' again and guess what I ended with the, Error message saying "tools.jar is not in android studio class path Please ensure JAVA_HOME points to JDK rather than JRE". 

As usual when it comes to settings related to default paths, what comes to our mind usually is, '.bashrc'. So I ran the following commands.

$ cd ~
$ vi .bashrc


I added the following lines at the end of the '.bashrc' having typed the comments for future references. Comments are shown after '#' in shell scripting.


# comment : the .bashrc is eddited to add java_home by Harsha
JAVA_HOME="/usr/lib/jvm/java-7-openjdk-i386"
export JAVA_HOME
PATH=$PATH:$JAVA_HOME

I Saved the file, and ran, 


$ source ~/.bashrc
$ echo $JAVA_HOME


Above is to test that it echoes the Java path. Then , I tried run the '/studio.h'. Still I kept getting the Error "tools.jar is not in  android studio class path Please ensure JAVA_HOME points to JDK rather than JRE". 

After digging the Internet for around 10 minutes, I found out the way of doing this. So, Here's the whole thing. Exporting the JDK path in the '~/.bashrc' won't give us the right answer. So do the following.


$ sudo apt-get install openjdk-7-jdk  [ If you don't have it ]
$ sudo vi /etc/environment


Add the line. 

JAVA_HOME=/usr/lib/jvm/java-1.7.0-openjdk-i386 


Save & Close. You probably would require a reboot of the System. After the Reboot is made, run the '/.studio.h' and you'd love using Android Studio which is a better application by the way.


Thank You.
How to get Ubuntu Linux Desktop 'Jelly' Conky ?

In this post, I wanted to write about 'Conky' of which you may or  may not have heard about before.

Conky is licensed under GNU Public License 3.0 and a free software  that runs in BSD.  It's a system monitor an extended version of 'Torsmo' which is no longer developed. Even if it's called a system monitor, it can be used to gather information from many sources like weather sources and time servers.


It's funny because it is said that Conky is a name adapted from a Canadian TV Show 'Trailer Park Boys' according to the Conky official web site.  Visit the Documentation of Conky here.


In this, post I thought of writing about a customized system clock  which will add colour to your Linux environment called 'Jelly Conky'.


  1. To add 'Jelly Conky' You've to install Conky installed in the first place so Open terminal by 'Ctrl+T'.

  2. To Install Conky run the following command.

    $ sudo apt-get install conky 


  3. Download Jelly Conky from here and extract the zip file to download location.

  4. Start a separate Terminal and run the following command to get the full permission to access directories.

    $ sudo nautilus


  5. Go to download extracted location and find 'jelly-conky' directory. You'll find a font directory jelly-conky/roboto-font. Access it and install all the .ttf (True Type Face) by 'double click'-> 'install'.


  6. Press 'Ctrl+H' to show the 'Hidden Files' and access jelly-modes and pick a widget you need either one of 'Clock','Clock+Date' or 'Clock+Date+Weather' with a preferred size 'Big' or 'small'.

  7. Copy hidden '.conkyrc' to 'home' directory. To do that run the following command. Either you can run the following command in the terminal or use GUI file manager to do so.

  8. Run the following command to install 'curl' in Linux.

    $ sudo apt-get install curl


  9. Open '.conkyrc' and start editing the file.

    $ sudo vi ~/.conkyrc


  10. Go to yahoo weather page here. Search your city, check the address bar and copy the WOEID (Where on Earth ID).

    ['http://weather.yahoo.com/sri-lanka/central/kandy-2189780/']


    In my case from the URL I copied '2189780' to the existing id of '44418' in the '.conkyrc'.
  11. Now run following command to run the Conky.

    $ conky 


  12. While the Conky is running, change either gap_x and gap_y or uncomment '#alignment' to move the Conky around.

    That's it. Enjoy.

Install MySQL Workbench with lampp Server in Linux

I've always been a great admirer of MySQL query browser & MySQL administrator tools provided by MySQL official website. But, currently they have limited the development of multiple GUI tools and instead focused on developing the MySQL workbench.

I'm a fan of  'Navicat Premium' in windows application because it serves multiple administration tasks as well as SQL Editing , Development, Designing for both Microsoft SQL & MySQL.


But, recently as my  love of Linux grew than I expected & I had to find new GUI tool specifically for MySQL in Linux. So, this blog post is about installing MySQL workbench the one I suggest everyone should try at least once. (I Used to hang on with 'Emma')

First, let me get this straight. This blog post was intended to be for people who currently do have lampp server installed in their Linux Operating System. (as I used to be one of them)

First, Download Libzip by using the links given below.


Then, Download libmysqlClient by using the links given below.


Then, Press Ctrl+ T & start your Terminal. Type the following Command. 

$ sudo apt-get install libzip1 python-paramiko python-pysqlite2 libctemplate0 libgtkmm-2.4-1c2a libmysqlclient16

Now, you can download MySQL Workbench from the official Download Page. If you're lazy enough not to find it here it is. Download .deb & type the following command in order to install it inside your Linux System.

sudo dpkg -i mysql-workbench-gpl-X.X.XX-XubuXXXX-XXXX.deb 

Hope, it worked. Thank You Enjoy MySQL Workbench.


Image Upload & Display : Java/ MySQL ?

This was an interesting topic for most of the people including myself, during the times when, there was a desperation finding code to perform the very action, 'Upload & Display' images with the Java application.

I thought to note it down, so that somebody else won't necessarily have to be desperate anymore reading a zillion articles and websites.

01. In order to this, first create a simple database.

use test;

create table img_Upload(
 nic varchar(10) not null,
        image BLOB,
        constraint pk_img_Upload primary key(nic)
);

Important: There are 2 ways to store images of your application. One is storing the file path & the other, storing image as a blob. I prefer blob here. Because, I've got less number of images & blob helps not to worry about moving the application around without caring about file paths.

02. Now, You can start creating your Java application using any IDE or manual coding. But, you've to include Database Connection class no matter what.

import java.sql.Connection;
import java.sql.DriverManager;

public class Connect {

    Connection con = null;
    String sourceURL = null;

    public Connect(){

        try {
            Class.forName("com.mysql.jdbc.Driver");
            sourceURL = "jdbc:mysql://localhost:3306/test";

        } catch (Exception e) {
            e.printStackTrace();
        }
    }

    public Connection connect(){

        try {
            con = DriverManager.getConnection(sourceURL,"user","mepassword"); // your user name password 

        } catch (Exception e) {
            e.printStackTrace();
        }
        return con;
    }

    public void close(Connection con){

        if(con!=null){

            try {
                con.close();

            } catch (Exception e) {
                e.printStackTrace();
            }
        }
    }
}

03. Then, create a jFrame with a 2 labels, button and a text box. (Add extra jFrame to display image from db)


       03.1. Write jLabel mouse clicked event to display JFileChooser & select the image, so that the selected image will be shown in the jLabel.


    private void jlbl_imageMouseClicked(java.awt.event.MouseEvent evt) {


        JFileChooser ch = new JFileChooser();
        ch.showOpenDialog(null);
        try {
            f1 = ch.getSelectedFile(); // create f1 as: static File f1 class variable so that it's accessible in other private methods
            try {
                Image img = ImageIO.read(f1);
                Image newimg = img.getScaledInstance(jlbl_image.getWidth(),jlbl_image.getHeight(), java.awt.Image.SCALE_SMOOTH);
                ImageIcon ik = new ImageIcon(newimg);
                jlbl_image.setIcon(ik);
            } catch (Exception e) {
                e.printStackTrace();
            }
            
        } catch (Exception e) {
            e.printStackTrace();
        }

        
    }

    03.2.  Write button action performed event like follows.

   
private void jbtn_submitActionPerformed(java.awt.event.ActionEvent evt) {

        Connection con = null;
        Connect dbConn = new Connect();
        try {
            con = dbConn.connect();
            FileInputStream fis = null;
            PreparedStatement ps = null;
            con.setAutoCommit(false);
            fis = new FileInputStream(f1);
            ps = (PreparedStatement) con.prepareStatement("insert into img_Upload values(?,?)");
            ps.setString(1,jtxt_usernic.getText().toString());
            ps.setBinaryStream(2,fis,f1.length());
            int stat = ps.executeUpdate();
            con.commit();
            if(stat==1){
                Display(jtxt_usernic.getText().toString()); // this displays image from db
            }
        } catch (Exception e) {
            e.printStackTrace();
        }
    }

Hope you've got everything alright. Test run the project. Here's a screen shot of my own output.


Thanks for coming. Have Your Comments.

Typing Tutor Software Revealed ?

                                  I desperately wanted to make this short. Because, this is about a software which is somewhat Commercial & doesn't have anything with me economically. In fact nobody needs to worry that I'm going to publicize a software or something.

I'm just Saying.

Since, a long time I desperately needed a software to do my typing practices. I kept going after the very famous 'Typing Tutor'  you see like everybody. But, I found a better solution while I kept looking at the screen of a fellow classmate of mine.

In fact, She's the one who introduced me to this, So keep reading I'm going to do the same to you.

The software is 'KeyBlaze Typing Tutor'. Here is Download Link For you.

1. After downloading You'll see a Setup file like follows.


2. Then, double click on it and you'll see the following screen.

3. Accept the agreement & click Next. Then comes the following.


4. My advice, don't install unnecessary stuff. Just install basic typing Expander and hit 'Finish'.


5. Then, select 'Yes, Let's test my speed ' to start right away, if you feel free to test some Typing Speed of you or you can let it go & start another time using the 'Desktop Icon' of yours.


6. You'll see a welcome screen whenever you start your Software.


7. Select 'Click to Start Exercise'. Set your goals (difficulty levels) and keep testing your skills.


After Each test, you'll be notified about the results of it which would surely be comforting when you feel you're making progress.


Enjoy ! Your Progress! 


Microsoft Excel Mathematical Functions ?


There're four types of functions that can be used in Microsoft Excel.

  • Mathematical Functions
  • Logical Functions
  • Statistical Functions
  • Date & Time Functions
Let's Start with some explanation about the way to type in your Microsoft Excel functions. First, select the cell & type your function in the Formula Bar below the Ribbon.


Alright, Let's start discussing about functions.

  1. Mathematical Functions
    • SUM - [=SUM(number1,number2,.....)] 

You've to include cell addresses inside the brackets with 'comma' as the separating symbol or sometimes you can enter a range of cells like in the following scenario.

    • PRODUCT - [=PRODUCT(number1,number2,....)]
You've to include cell address inside the brackets like the above mathematical function which is a SUM.
 
 
    • FACT - [=FACT(number)]
For those who know what Factorial in mathematics this functions would be helpful & understandable in the first place. You've to enter a cell number inside the brackets.
 
 
    • POWER - [=POWER(number1,number2,....)]
Similar to above functions you've got to enter a cell address or a static numerical value inside the brackets. Gives the x power of y number.
 

    • SQRT - [=SQRT(number)]
 
    • MOD - [=MOD(Number, Divisor)]
 Returns the remainder after a number is divided by a divisor.
 
 
=MOD(49,7) = 0
    • INT - [=INT(number)]
Rounds the number to the nearest integer.

=INT(34.4323) = 34
    • ROUND - [=ROUND(number, number of digits)]

Rounds a number to a specified number of digits.


=ROUND(25.1213,3) =25.121
    • QUOTIENT - [=QUOTIENT(numerator, denominator)]
 
 
Returns the integer portion of a division. Use this function when you want to discard the remainder of a division.
    • SUMPRODUCT - [=SUMPRODUCT(array1,array2)]


= (49*3)+(1*2)=149

    • SUMIF - [=SUMIF(range, criteria,sum_range)]
Adds the cell specified by given criteria.


=SUMIF(A2:D2,"S",A1:D1) = 4


You can catch all these functions and more in the formula tab of the ribbon Math & Trig Drop down. Try to study forward & Enjoy!


"Installing Ubuntu 9.10 Desktop Edition in Windows XP"


First of all, you should have a live CD or a requested Ubuntu Desktop edition to process with this. I prefer a new hard disk to install Ubuntu for the first time, because it’s nothing to panic with the probability of losing your data in the other partitions or disks. (That’s what I did; my next post will be about dual boot settings)
So:
1.Request an Ubuntu CD (Free Linux) from www.Ubuntu.com OR
2.Download Ubuntu from the same website and make an Ubuntu live CD
3.Buy a separate hard disk about 10GB of capacity (make dual boot settings)

My choice was to request and I could have a free CD:


--> It’s Ubuntu 9.10 and it’s the latest which was released October 2009. Just log onto Windows (XP for me) and enter the disc into the disc driver. It has an auto run (otherwise double click on the icon shown below)


And following box will be shown on your screen.


  • Click on ‘Install Inside Windows’ and you’ll see the following:

  • Remember! Select the appropriate installation drive from the drop down menu and select minimum 3GB of space to compress and install Ubuntu which will take some time more than normal.
  • You can add your name and password. Usually, as this is inside windows the user name in windows has taken as the default value.


  • You’ll see the above after you click on ‘Install’.
  • CD would come out of the Rom. Then it is asked to reboot the computer. Click yes and it will straight go to Ubuntu, but remember to select Ubuntu in the dual boot process.
  • After that it’s all about an automatic process. The package which was installed inside windows in the separate hard drive performs and getting installed as an operating system.
Yes, that’s all its easy isn’t it easy. Enjoy Ubuntu Linux 9.10. God protects you all!