Showing posts with label Windows. Show all posts

Disk Usage reaching 100% disable superfetch in Windows PC

In some occasions when running Windows on Laptops and similar kind of machines with a less specification, we could sometime notice Disk Usage is reaching to 100%. 


This could be happened due to many reasons. But, in here we discuss about Superfetch service. This particular Superfetch service is a Windows feature that enables Preloading most frequently used Windows Applications. Even if the, original purpose of this is to boost loading speed, the Background process running in Windows could certainly cause high resource utilization, due to which HDD (Hard Disk Drive) usage would reach up to 100%. 


We can temporarily mute (disable) the Service, for this a System Restart is although imminent. 

1. Go to Start ⊞ Win

2. Type CMD.

3. Right Click on CMD Icon on Start Menu.

4. Open Command Prompt like 'Run as Administrator'.

5. Type Below Command.

sc stop “SysMain” & sc config “SysMain” start=disabled

6. Reboot Computer.


Now, you may be able to see if it actually do the trick and cause a drastic change in Hard Disk Utilization. If it doesn't provide any solution and you would need the Superfecth for faster application loading, use below command. 


1. Go to Start ⊞ Win

2. Type CMD.

3. Right Click on CMD Icon on Start Menu.

4. Open Command Prompt like 'Run as Administrator'.

5. Type Below Command.

sc config “SysMain” start=auto & sc start “SysMain”

6. Reboot Computer.


Signing Off ~ Peace!!

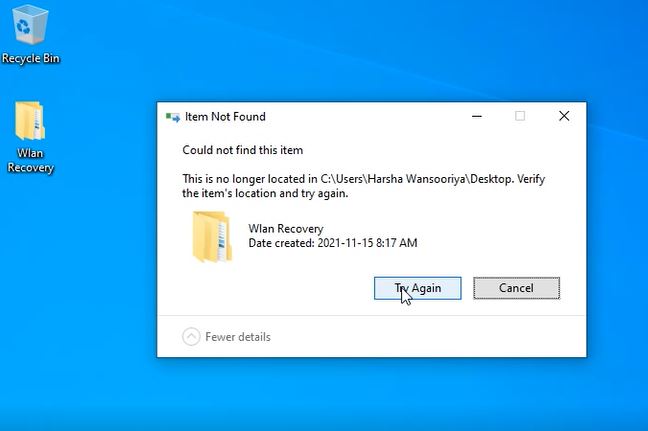
Quick Fix - Could not find this item. This is no longer located. Verify the item location and try again”

If you encounter below Error, and you are unable to delete an unwanted folder in Windows, there are things you need to do and you need to know before doing them.

“Could not find this item. This is no longer located in [Path]. Verify the item’s location and try again”

Most likely, File is created by a running third party service (An Application) and file extension is unrecognized in windows.


rd  - is the directory removal command in CMD.

1. Go to Start ⊞ Win

2. Type CMD

3. Type Below Command & Make sure to replace [PATH] with your undeletable Folder Location.

rd /s \\?\X:\"Need to delete path"

For Example : 

rd /s \\?\"C:\Users\Harsha\Desktop\Wlan Recovery"

This will completely remove the Directory. you will be able to see that the directory is no longer there use below command. 

cd "C:\Users\Harsha\Desktop\Wlan Recovery"
dir


Hope it Works!! Peace .

Wireless Ad Hoc Internet Connection with Windows 8/8.1

If you're a person who travels a lot, even if you like, you don't have the luxury of Carrying your WiFi router every where you go. Probably you're using a Wireless Broadband Connection with a typical Mobile Broadband USB Stick , the Dongle as we call it, whenever you're on the move.

But, unfortunately if you're using a a Smart phone or another laptop other than the one you're using, You may need another one of those Broadband Connections or a data Connection along side a Dongle in the case of  a Laptop. 

Even if you wanted to buy a Mobile Broadband WiFi Router Dongle it'll cost you $50-$60, if you're looking for at least a Huawei Product. It's an extra burden, as You've to carry the Charger, the dongle itself with USB Cable and Lithium Ion Battery.


You don't have to do this, as you can create an Ad Hoc Wireless Internet Connection by using your Laptop to share the internet connection with Any other device. So, Here's how you do it.

I've used the Term Windows 8/8.1 as you can see in the Topic, Because I've it installed in my Computer as well as the fact that, this feature isn't highlighted as a Separate tool or something But, it's obvious that Turning A PC into a Virtual Router is quite intriguing. So, Follow the Easy Steps as usual.


01. Run the Command Prompt with Administrator Privileges.


02. Run the Following Command to make sure that, your Wireless interface Supports Hosted Networking Which is vital to create the Ad Hoc Connection.

 netsh wlan show drivers 

03. Check if, it Shows "Yes" for the Hosted Network Support. You've make sure that, your Wireless interface supports Hosted Network or else you've to upgrade your hardware.


04. Then, type the Following Command into the Command Prompt with your own, Revisions to it as your SSID and key should be unique for you.


wlan set hostednetwork mode=allow ssid="network_name" key="password"


after running the Command, make sure you get the Result as follows.  


05. Then, type the following Command in to the Command Prompt to start the Hosted Network. You can use the same command with the Revision "Stop" instead of "Start" to Stop the Network being Broadcasted.


netsh wlan start hostednetwork


06. Make sure that You've enabled your WiFi Adapter in the "Change Adapter Settings" and One Final thing, you've to enable the current Internet Connection with the Dongle to Share in order to do that, Go to "Network and Sharing Center" & to the Properties of the Current Connection.


07. Then, go to "Sharing" Tab. Enable "Allow other network users to connect through this Computer's internet Connection" and Select the Connection from the Drop down.


Then, try using the already broadcasting WiFi Connection with Any of your Device. Enjoy!


'Reparing Linux Grub Menu' ?

If you ever wanted to have Linux alongside Windows Operating System, I think you're up to something good. I don't want to use 'Better' because that term is valid for people who're going to have Linux only. [ Note : not the dual boot ]

But, dual boot is good as a start, besides Experiencing tech in plural is  better than holding on to singular mostly. [ Note : use both Windows & Linux ] Among the favourite Linux Distributions Ubuntu has the More friendlier option of installing with Wuibi , which I used to do years ago. But, if you ever messed-up with your Windows Partition you loose your Linux as well.

So, I prefer the other way, which is installing Ubuntu first & Windows Later. But, Whenever you do that you loose your Grub Menu, [ Note : Used to Opt the Operating System During Boot ] Because, Windows installer is used to

To recover your Grub Menu. Follow the Steps.

Step 01 : Pick an Ubuntu image [12.04+] & either create a Live CD/USB. [ Note : use 'Start-up Disk Creator' in a separate Ubuntu ]

Step 02 : Change BIOS settings Boot Order & Boot with the Live CD/USB.

Step 03 : Choose a language [Note : Usual ]  & 'Try Ubuntu' not 'Install Ubuntu'.

Step 04 : Whenever, You're in the Usual Ubuntu Desktop view. Press Ctrl+Alt+T & run Terminal.

Step 05 : Make sure you're connected to Internet & type following Lines to the Terminal.

sudo add-apt-repository ppa:yannubuntu/boot-repair && sudo apt-get update
sudo apt-get install -y boot-repair && boot-repair

Select 'Recommended Repair' in the Boot Repair Window at the end of Package updates & installation of boot-repair.


Restart, the Computer & check whether your Grub Menu is there.

Ubuntu : 'Unable to Mount File System' with Windows 8

                      It's good to write something after a long time here in beloved Blogger. This is about something I'd to go through recently with the desperate attempt to get Windows 8 installed alongside Ubuntu. Finally, it worked as usual, after long search battles & mistakes along the way.

Anyway, After the installation I'd a little bit of a problem even though it sounds little it wasn't actually Here's Why ?

I usually leave lot of disk space for windows & an extra partition for the rest of the files formatted NTFS Because, I can Keep installing Lot of funky Software & games in Windows & most importantly, Inside Linux I can still access NTFS file partition. [ Note : Windows Can't access ext3 ext4 ]

Soon, after the installation I booted Ubuntu to make sure I can access my files in the NTFS partition. But, I couldn't I tried to Mount It didn't work either Here's the Message I got.


Funny, not at all. It worked with Windows 7 though at times it didn't when w7 was hibernated. I restarted & tried to make sure I've Shut down W8  perfectly. Same thing Happened Over & over again.

Here's the Fact. This is usual with Windows 8. It doesn't completely shut down. [ Note : Windows 8 Hibernates to decrease the Boot time ]


Here's how to get rid of Windows 8 Hibernation Problem. Believe Me, The changes We're going to make will :

  1. Increase  the Boot Time . [ Note : Decrease the Speed of Booting ]
  2. Cause System Error Messages to Pop up
  3. Decrease the smooth of Tile View.
But, you don't need to reinstall Windows 7. Don't You ? So, Go to Windows 8 & follow these steps.

Step 01 : Press ♣ & Go to Tile view & start Typing 'Control Panel'. Change the View to 'Small Icons'.


Step 02 : Choose Power Options. Then, click on the Link on the Left side 'Choose what the power button does'.


Step 03 : Then, click on the link 'Change settings that are currently unavailable'.


Step 04 : Then, tick off the 'Turn on fast Start-up ( Recommended ) '. [Note : See it's recommended ]


That's it You're done try accessing the NTFS partition now. Thanks for being here.

XAMPP: MySQL said: Cannot connect: invalid settings ?

Everybody should be careful when dealing with the 'users' & 'privileges', if you're using PhpMyadmin. I had pretty horrendous experience with this.

To be honest, I was removing users & mistakenly removed the root user. Then, I couldn't even load the PhpmyAdmin at http://localhost/phpmyadmin. When I tried, I had the following error.This means that, I don't have any access to mysql server.

MySQL said:

Cannot connect: invalid settings.
phpMyAdmin tried to connect to the MySQL server, and the server rejected the connection. You should check the host, username and password in your configuration and make sure that they correspond to the information given by the administrator of the MySQL server.

After searching for solutions for a little bit of time. I'd found the following solution. I write this blog post , so that it'll be helpful for somebody with the same problem.

Step 01.

First, stop the MySQL service using XAMPP Control Panel.


Step 02

Then, Run Command Prompt & go to the 'mysql' installation directory. In my case, It's C:/xampp/mysql.

cd C:/xampp/mysql

Step 03

Then, locate 'resetroot.bat' file and to edit it with notepad, run the following command in the command prompt.


notepad resetroot.bat

Step 04

Find 'bin\mysqld.exe' in the .bat file & in the same line locate a text simliar to '--no-defaults'. Add the following text after leaving a space. Save the file.


–datadir=c:/xampp/mysql/data

Step 05

Now, run resetroot.bat using Command Prompt. Then, Start MySQL service using XAMPP Control Panel.

That's it. You can reach PhpmyAdmin. Thank You.

32 bit or 64 bit ?

If you're attempting to upgrade your existing system, you might have dealt with this problem lately, which is to select one from either 32 bit or 64 bit.


In fact, I had to do the same research like others & decided to note down my personal experience on this.

But, you've to remember that, 32 bit & 64 bit that you might have referred until now, should be either one of ;

  1. Processor Technology or
  2. Application Technology.

Processor Technology - 64 bit Processor Technology refers to the Processors which use 64 bit long Memory addresses , Integer Size and Data Path widths.

Sometimes, your Processor might be 64 bit or 32 bit. To know that, if you're Linux user Use your terminal & Type the following command.

$ grep flags /proc/c

The output will surely be messy. So, for the knowledge if your processor is 64 bit Then, you'll see an output similar to this.

flags           : fpu vme de pse tsc msr pae mce cx8 apic sep mtrr pge mca cmov pat pse36 clflush dts acpi mmx fxsr sse sse2 ss ht tm pbe nx lm constant_tsc pni monitor ds_cpl vmx est tm2 ssse3 cx16 xtpr lahf_lm

You'll notice that in your output, you find a 'lm constant_tsc'.  Do you ? Then, your processor is 64 bit  and if not, it might be 32 bit. 


And if you use windows, Go to your Start Menu & type, 'Performance Information and Tools'.


Then, you'll find that, the 'View and print detailed performance and system information' link. Click on it. Under the categories find, '64-bit Capable'. If it says Yes, your processor might be 64 bit.


Basically, 64 bit Processor;

  1. Theoretically, Supports RAM to Maximum Level of 16 EB (Exabyte) . Approximately, 17.1 Billion Gigabyte.
  2. Supports 32 bit Applications. (Still Limited Number) and 64 bit applications.
  3. Application Support is still in an emerging state.
  4. Faster - RAM keeps more Memory.
  5. Supports High Quality Graphics Applications.
And, 32 bit Processor ;
  1. Only Supports for limited amount of memory which is around 3.25 GB. Memory beyond that limit will ultimately, be erased from RAM to HDD. (Processor Address Extension (PAE) is an improvement)
  2. Only supports 32 bit Applications.
  3. Application Support is higher.
  4. Slow - Interaction between HDD & RAM due to Memory Limitation makes it slower.
  5. Graphic Quality is less than 64 bit.


Application Technology - 64 bit in terms of Applications can be defined as applications that handles large amount of memory in RAM. In Simple Terms, 64 bit Applications are designed to run on 64 bit Processors & Vice-Versa.

According to PC Magazine  for the month of July, 2010 the percentage of 32 bit version Windows 7 is around 54% , Compared to the 64 bit Version of the same OS. But, the gap was somewhat, larger in previous version of Windows OS s.

For example, In Windows Vista the Percentages were approximately, 89 % to 11% of 32 bit Users.

So, when the demand goes up, the supply chain of modern applications that use, 64 bit technology is in its ascendancy.

If you use Linux, to know your  Kernal of OS is either 64 bit or 32 bit, Take out your terminal & type following Command.

~$ uname -a

If you see an output that shows x86_64 GNU/Linux it indicates that you have a 64bit Linux kernel running. If you use see i386/i486/i586/i686 it is a 32 bit kernel.

In windows, Go to Control Panel > System and Security > System   and look for System Type.

So, that's enough I guess. You can search Google & even Youtube contains some videos on this.

Enjoy your day !


Logical Functions of Ms Excel ?

                                         Previously in a blog post I noted down the key Mathematical Functions of Ms Excel. For whom, it wasn't seen by, read it here.

Logical Functions in Ms Excel will be familiar for those who already learned some programming. But, for them & others syntax of this Ms Excel exampled in here will sure be important as well as worth reading.

Logical Functions will be explained with proper examples as well as images that will be helpful to you.

1. AND - Returns true if all the arguments are true & returns false if any argument is false.


In the above example, A1>=20 & B1=34 & C1<=50 are true. So, as all of the arguments are true the result should be 'TRUE'.


Look at the following example. A1>=20 is the only argument which is true but the result is 'FALSE', as the other two arguments are false. (<> not equal)


2. OR - Returns true if any argument is true & returns false if all arguments are false.


In the above example, A1>20 is the only argument which is true. Both, B1<>(not equal)34,C1<>42 are false. But, the result should be 'TRUE'.


Look at the example below, all the arguments are false here.


The result is false. Having all argument false makes the OR function to return false.


3. NOT - Returns the reverse of the true of false state of an argument. Look at the example below. The A1<>21 is false.


But, ironically it returns true. That's because of the intervention of =NOT() function.


In the following Example A1=21 is true.


Instead of returning the actual state, It returns false.


4. If - returns the value which is set as arguments, when the logical test provided (also as an argument) is true or false.


In the Example, the provided logical test is correct & the function returns "Correct" which is set by us. You can your provide your own value here.


That's it for this Post! Hope You Enjoy Ms Excel Logical Functions.

Typing Tutor Software Revealed ?

                                  I desperately wanted to make this short. Because, this is about a software which is somewhat Commercial & doesn't have anything with me economically. In fact nobody needs to worry that I'm going to publicize a software or something.

I'm just Saying.

Since, a long time I desperately needed a software to do my typing practices. I kept going after the very famous 'Typing Tutor'  you see like everybody. But, I found a better solution while I kept looking at the screen of a fellow classmate of mine.

In fact, She's the one who introduced me to this, So keep reading I'm going to do the same to you.

The software is 'KeyBlaze Typing Tutor'. Here is Download Link For you.

1. After downloading You'll see a Setup file like follows.


2. Then, double click on it and you'll see the following screen.

3. Accept the agreement & click Next. Then comes the following.


4. My advice, don't install unnecessary stuff. Just install basic typing Expander and hit 'Finish'.


5. Then, select 'Yes, Let's test my speed ' to start right away, if you feel free to test some Typing Speed of you or you can let it go & start another time using the 'Desktop Icon' of yours.


6. You'll see a welcome screen whenever you start your Software.


7. Select 'Click to Start Exercise'. Set your goals (difficulty levels) and keep testing your skills.


After Each test, you'll be notified about the results of it which would surely be comforting when you feel you're making progress.


Enjoy ! Your Progress! 


Microsoft Excel Mathematical Functions ?


There're four types of functions that can be used in Microsoft Excel.

  • Mathematical Functions
  • Logical Functions
  • Statistical Functions
  • Date & Time Functions
Let's Start with some explanation about the way to type in your Microsoft Excel functions. First, select the cell & type your function in the Formula Bar below the Ribbon.


Alright, Let's start discussing about functions.

  1. Mathematical Functions
    • SUM - [=SUM(number1,number2,.....)] 

You've to include cell addresses inside the brackets with 'comma' as the separating symbol or sometimes you can enter a range of cells like in the following scenario.

    • PRODUCT - [=PRODUCT(number1,number2,....)]
You've to include cell address inside the brackets like the above mathematical function which is a SUM.
 
 
    • FACT - [=FACT(number)]
For those who know what Factorial in mathematics this functions would be helpful & understandable in the first place. You've to enter a cell number inside the brackets.
 
 
    • POWER - [=POWER(number1,number2,....)]
Similar to above functions you've got to enter a cell address or a static numerical value inside the brackets. Gives the x power of y number.
 

    • SQRT - [=SQRT(number)]
 
    • MOD - [=MOD(Number, Divisor)]
 Returns the remainder after a number is divided by a divisor.
 
 
=MOD(49,7) = 0
    • INT - [=INT(number)]
Rounds the number to the nearest integer.

=INT(34.4323) = 34
    • ROUND - [=ROUND(number, number of digits)]

Rounds a number to a specified number of digits.


=ROUND(25.1213,3) =25.121
    • QUOTIENT - [=QUOTIENT(numerator, denominator)]
 
 
Returns the integer portion of a division. Use this function when you want to discard the remainder of a division.
    • SUMPRODUCT - [=SUMPRODUCT(array1,array2)]


= (49*3)+(1*2)=149

    • SUMIF - [=SUMIF(range, criteria,sum_range)]
Adds the cell specified by given criteria.


=SUMIF(A2:D2,"S",A1:D1) = 4


You can catch all these functions and more in the formula tab of the ribbon Math & Trig Drop down. Try to study forward & Enjoy!